In a nutshell
- 🧼 Old-school yet effective: non-gel white toothpaste uses gentle abrasives to lift scuffs and brighten rubber, canvas, and coated leather without harsh chemicals.
- 🧪 Choose wisely: stick to plain white paste; avoid gels, dyes, and strong whitening agents; always patch test and skip suede/nubuck to prevent damage.
- 🪥 Method that works: remove laces, dry-brush, apply a pea-sized dab, scrub in small circles with light pressure, wipe clean, air-dry, and condition leather; a pinch of baking soda can boost sole cleaning.
- 📋 Material cues: target rubber midsoles (quick circular scrub), use sparingly on coated leather (buff after), and spot-treat canvas (short dwell, re-agitate) for best results.
- 🌿 Pro tips + longevity: pre-wipe with micellar water, use a light touch with a melamine sponge on tough scuffs, finish with protector spray, and rotate with pH-balanced cleaners for sustainability.
Before sneaker drops became calendar events and boutique care kits crowded store shelves, a humble tube in the bathroom cabinet carried the day. The old trick? Non-gel white toothpaste. It tackled scuffs, lifted grime, and restored brightness on everything from canvas tennis shoes to leather loafers. It wasn’t fancy, but it was fast, cheap, and reliable. Here’s the twist: this no-frills method still works, often better than pricier options. Backed by chemistry and years of practical use, toothpaste remains a surprisingly effective cleaner when used correctly. If your sneakers look tired or your Oxfords have lost their snap, the classic paste might be your easiest win.
The Old-School Secret: Toothpaste, a Gentle Abrasive That Shines
Toothpaste succeeds because it’s built around mild abrasives like hydrated silica or calcium carbonate. These fine particles scrub away surface stains and oxidation without gouging most shoe materials. Add in surfactants, which help loosen oily dirt, and humectants that keep the paste workable, and you’ve got a smart cleaning slurry engineered to lift residue delicately. The result is controlled micro-polishing that brightens rubber, smooths scuffs on coated leather, and freshens canvas without harsh solvents. It’s chemistry with a human-friendly touch, repurposed from dental care to sneaker care.
It also shines because it’s accessible. A soft toothbrush and a pea-sized dab can reach eyelets, welt seams, and textured midsoles quickly. Unlike many household cleaners, toothpaste doesn’t typically discolor whites, and rinses clean with water. There are caveats: steer clear of suede and unsealed nubuck, and avoid heavily dyed pastes that could tint fabric. But used thoughtfully, the bathroom staple still earns its reputation as a shoe-saver. For many readers, that’s not nostalgia—it’s a handy, science-backed shortcut.
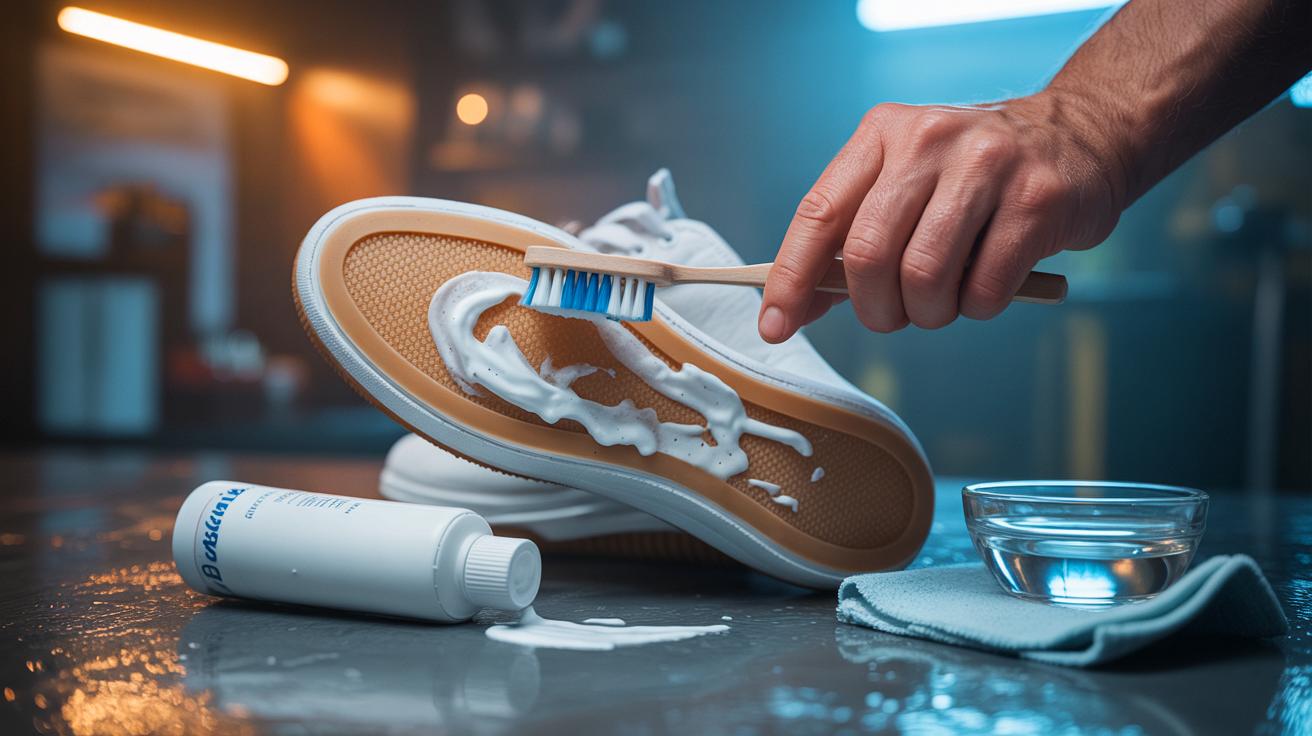
Step-by-Step: How to Use Toothpaste on Different Shoes
Start with the basics. Remove laces and knock off loose dirt with a dry cloth. Dampen a soft brush or cloth, then dot on non-gel white toothpaste—plain, not whitening with strong bleaches. Work in small circles, low pressure, letting the paste do the work. On rubber midsoles, a 60–90 second scrub per section lifts gray scuffs and street film quickly. For leather, apply sparingly and buff lightly, focusing on marks, not the entire panel. For canvas, treat stained areas, pause 2–3 minutes, and gently agitate again. Wipe with a clean damp cloth until no residue remains, then air-dry away from direct heat. Re-lace and, for leather, finish with a conditioning cream to restore suppleness.
Want extra pop on white soles? Mix a tiny pinch of baking soda into the paste for a touch more grit, but keep it gentle. Keep toothpaste away from raw edges of dyed suede, untreated nubuck, and delicate aniline leathers. Test first on a hidden spot. Less is more: over-scrubbing can haze glossy coatings and create micro-swirl marks. Consistency beats force—two light passes outperform one aggressive session, every time.
| Surface | Toothpaste Type | Technique | Notes |
|---|---|---|---|
| Rubber midsoles | Non-gel white | Small circles, light pressure | Rinse thoroughly to avoid chalky film |
| Coated leather | Non-gel white | Sparingly, then buff | Follow with conditioner |
| Canvas | Non-gel white | Spot treat, short dwell, re-agitate | Air-dry; avoid color bleeding |
| Suede/nubuck | None | Do not use | Use a suede eraser/brush instead |
What Works, What Doesn’t: Formulas, Finishes, and Safety
For best results, stick to plain, non-gel white toothpaste. Gel formulas lack the right abrasives, and heavily dyed or glittery variants can stain fibers. Whitening pastes are a maybe: some are fine, others contain strong bleaching agents or optical brighteners that may streak fabrics. When in doubt, patch test on the inside heel or tongue. Patent leather is slippery territory—use minimal product or avoid altogether to prevent dulling the mirror finish. For premium leather, keep the paste off raw edges and seams; clean the scuff only, then nourish with a leather cream.
Safety-wise, don’t mix toothpaste with ammonia or chlorine cleaners; there’s no benefit and some risk. Limit dwell time on dyed canvas to reduce color lift. If shoes carry a factory-protective coating, toothpaste can mildly haze it after repeated sessions; alternate with a pH-balanced cleaner to preserve finish. And watch the brush: medium-bristle toothbrushes work, but a soft shoe brush or microfiber cloth is gentler where it counts. The goal is controlled abrasion, not a sanding job. That’s how the old trick keeps paying dividends.
Beyond the Brush: Pro Tips, Time-Saving Tweaks, and Sustainability
Make it efficient. Pre-wipe with a micellar water pad to lift oils, then spot-clean with toothpaste for scuffs only—less mess, faster rinse. For stubborn heel drags on white walls, pair toothpaste with a melamine sponge, barely damp, and keep strokes short to avoid burnishing. A thin coat of sneaker protector after cleaning dramatically slows future staining. Runners? Address salt lines with a 1:1 mix of water and white vinegar first, dry, then polish out remaining marks with paste. Leather lovers should follow with conditioner or balm; the mild abrasives can subtly matte high-wear zones if left un-nourished.
It’s also a smart sustainability move. Instead of buying a single-purpose cleaner for every material, you repurpose a common household product and reduce waste. That said, don’t overuse it. Rotate with saddle soap for leather or a gentle laundry solution for canvas uppers to balance cleaning and longevity. Store an old soft-bristle brush and a small tube in your entryway kit for quick touch-ups after rainy commutes. Small habits keep shoes looking newsroom-ready—without a boutique budget or complicated routine.
Old advice survives for a reason. Toothpaste, used with care and common sense, erases scuffs, revives whites, and buys time between deeper cleans. It’s accessible, effective, and backed by a simple chemical edge. One tube turns into a multi-surface solution, especially for rubber and coated leather. There are limits—skip suede, test first, condition leather—but the payoff is real and immediate. As shoe care swings between luxury kits and viral hacks, this steady classic still earns a spot on the shelf. What pair in your closet is begging for a quick toothpaste test this week?
Did you like it?4.4/5 (30)
Tried this on my grimy white midsoles tonight and wow, instant glow-up. The pea-sized dab tip plus light circles made all the difference. Appreciate the reminder about conditioning leather afterward—my loafers look crisp again!
Grandma was right again; the bathroom tube saves the day. I used a kid’s soft brush and now my sneakers look like they passed a job interview. Any tricks for getting into the tiny eyelet edges without flooding them?
Quick question: does plain white toothpaste risk lifting dye on navy canvas Converse? I saw your short dwell time advice, but I’m worried about halos around the stains. Would micellar pre-wipe reduce that?
This is briliant, thank u! I did a patch test on coated leather and the buffing step really popped the shine 🙂 Also the baking soda pinch on the soles worked fast without scratching.
As a retail shoe fitter, I back the light-pressure guidance. Over-scrubbing creates haze on coated leather panels. Two short passes plus a conditioner restore both color and handfeel. Nice callout on avoiding suede and nubuck entirely.
Takes me back to high school track meets—locker room toothpaste rescues before photos. Your reminder to rinse thoroughly to avoid a chalky film is clutch. I’ll add protector spray this time for weekend longevity.
How minimal is ‘minimal’ on patent leather? I’ve got black patents with scuffed heels. Would a barely damp microfiber with a trace of paste, then immediate buff, be safe, or should I skip and use a glaze?
Haha, my midsolez were tragic. Followed the 60–90 second scrub per section and they’re bright again. I’ll rotate with a pH-balanaced cleaner like you suggest so I don’t overdo it. Big win.
Love the micellar water pre-wipe tip. Cuts the grease so the paste doesn’t smear. That alone saved me time and half a roll of paper towels. Bookmarking for rainy-day commutes.
Question on brushes: soft toothbrush vs microfiber—does one reduce those tiny swirl marks more on glossy coatings? I’m aiming for zero haze on my Air Force 1s. Great guide, super cleer! 🙂
Repurposing a common product instead of buying yet another bottle is such a low-waste flex. I keep a travel tube and an old brush by the door now; quick touch-ups after the dog park keep white walls presentable.
Does this method help with salt lines on winter boots after the vinegar step? I’ve got tan coated leather and don’t wanna mess up teh finish. How long should I let it dry before conditioning?
Note to self: toothpaste is for teeth, shoes, and apparently my sanity before meetings. The short dwell on canvas rescued my slip-ons between classes. Any advice on keeping laces from graying without bleaching?
Thank you for the clear material cues. Targeting rubber midsoles with circles, using sparingly on coated leather, and spot-treating canvas finally gave me consistent results. I was cleaning the whole panel before—no more!